|
|
||
|---|---|---|
| .github/workflows | ||
| .vscode | ||
| docs | ||
| include | ||
| lib | ||
| src | ||
| test | ||
| webapp | ||
| webapp_dist | ||
| .gitignore | ||
| auto_firmware_version.py | ||
| COPYING | ||
| LICENSE | ||
| partitions_custom.csv | ||
| platformio.ini | ||
| README.md | ||
OpenDTU
Background
This project was started from this discussion (Mikrocontroller.net). It was the goal to replace the original Hoymiles DTU (Telemetry Gateway) with their cloud access. With a lot of reverse engineering the Hoymiles protocol was decrypted and analyzed.
Currently supported Inverters
- Hoymiles HM-300
- Hoymiles HM-350
- Hoymiles HM-400
- Hoymiles HM-600
- Hoymiles HM-700
- Hoymiles HM-800
- Hoymiles HM-1000
- Hoymiles HM-1200
- Hoymiles HM-1500
- TSUN TSOL-M800 (Maybe depending on firmware on the inverter)
Features for end users
- Read live data from inverter
- Show inverters internal event log
- Uses ESP32 microcontroller and NRF24L01+
- Multi-Inverter support
- MQTT support
- Home Assistant MQTT Auto Discovery support
- Nice and fancy WebApp with visualization of current data
- Firmware upgrade using the web UI
- Default source supports up to 10 inverters
- Time zone support
Features for developers
-
The microcontroller part
- Build with Arduino PlatformIO Framework for the ESP32
- Uses ESPAsyncWebserver and Async MQTT client
-
The WebApp part
- Build with Vue.js
- Source is written in TypeScript
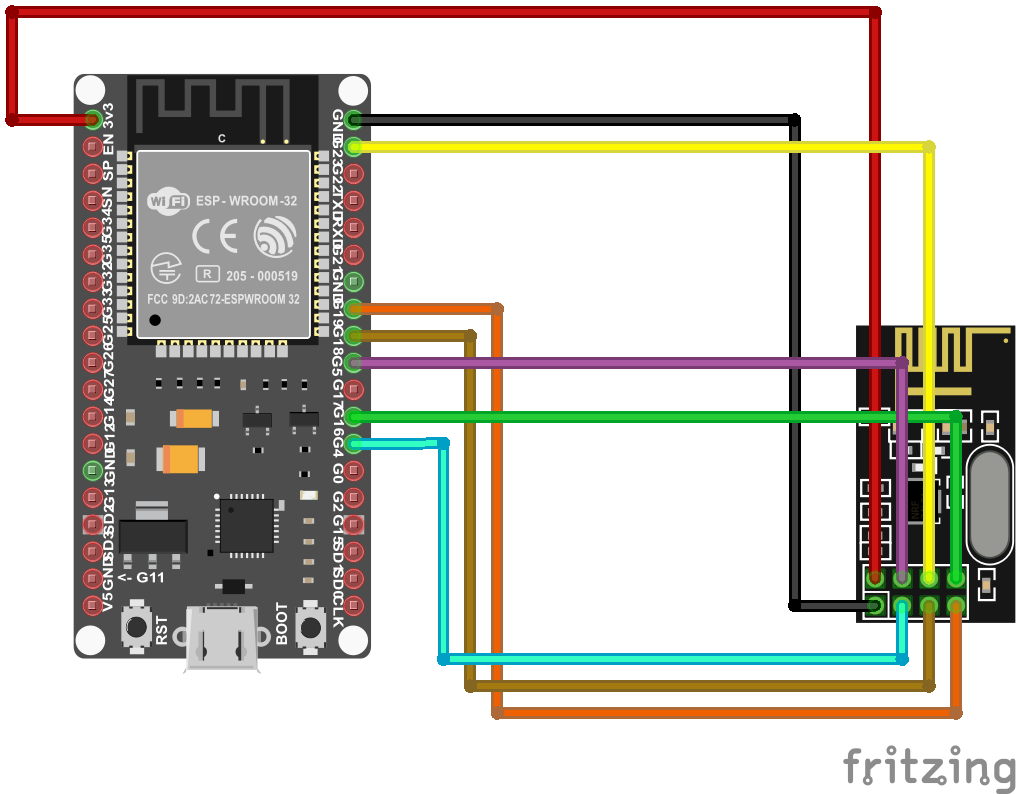
Wiring up
Schematic
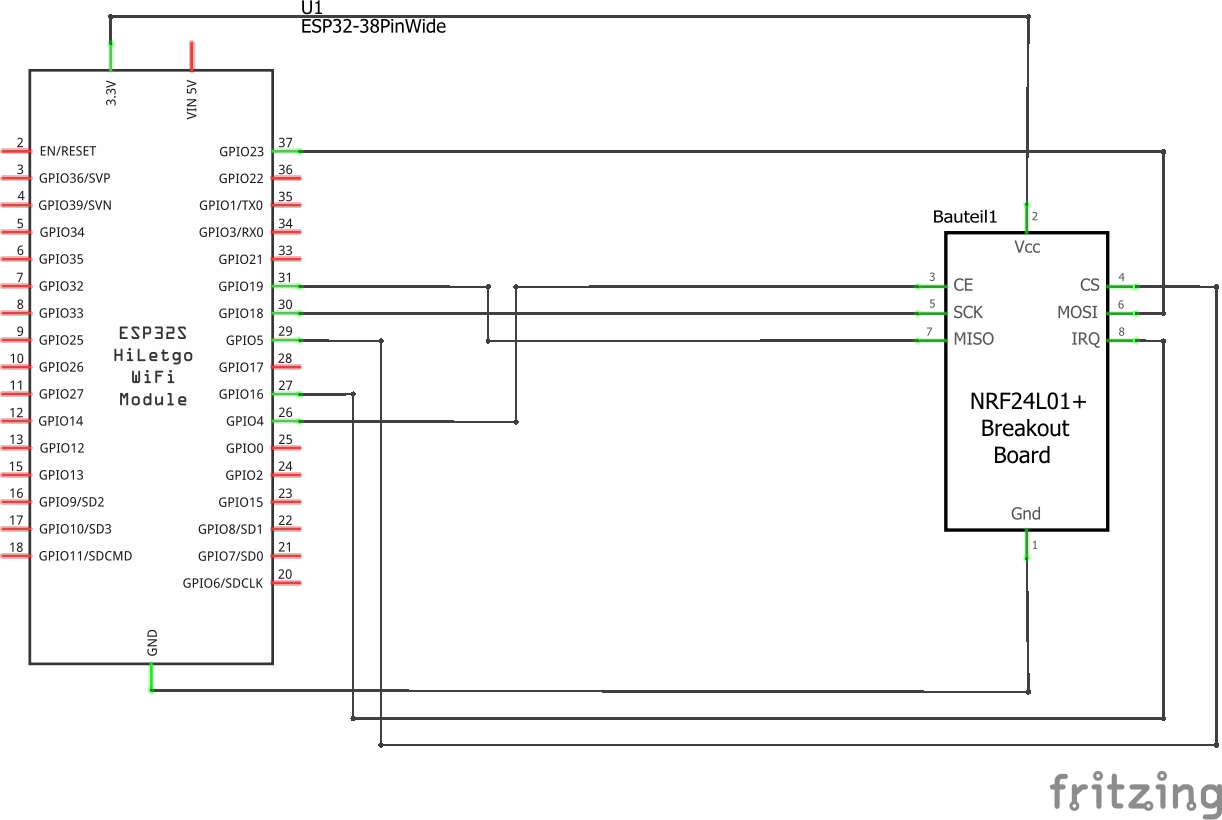
Symbolic view
Change pin assignment
Its possible to change all the pins of the NRF24L01+ module. This can be achieved by editing the 'platformio.ini' file and add one or more of the following lines to the 'build_flags' parameter:
-DHOYMILES_PIN_MISO=15
-DHOYMILES_PIN_MOSI=2
-DHOYMILES_PIN_SCLK=14
-DHOYMILES_PIN_IRQ=13
-DHOYMILES_PIN_CE=16
-DHOYMILES_PIN_CS=5
Flashing and starting up
- Install Visual Studio Code
- In Visual Studio Code, install the PlatformIO Extension
- Clone this repository (you really have to clone it, don't just download the ZIP file. During the build process the git hash gets embedded into the firmware. If you download the ZIP file a build error will occur)
- In Visual Studio Code, choose File --> Open Folder and select the previously downloaded source code. (You have to select the folder which contains the "platformio.ini" file)
- Adjust the COM port in the file "platformio.ini". It occurs twice:
- upload_port
- monitor_port
- Select the arrow button in the status bar (PlatformIO: Upload) to compile and upload the firmware. During the compilation, all required libraries are downloaded automatically.
First configuration
- After the initial flashing of the microcontroller, an Access Point called "OpenDTU-*" is opened. The default password is "openDTU42".
- Use a web browser to open the address http://192.168.4.1
- Navigate to Settings --> Network Settings and enter your WiFi credentials
- Currently you have to look at your router to determine the IP of the newly connected device
Available cases
Building
-
Building the WebApp
- The WebApp can be build using yarn
$ yarn install $ yarn build- The updated output is placed in the 'webapp_dist' directory
-
Building the microcontroller firmware
- Visual Studio Code with the PlatformIO Extension is required for building